Articles
Step-by-step installation tips for Riva concealed flush tanks
Step-by-step installation tips for Riva concealed flush tanks
There is a certain undeniable magic in a clean, minimalist bathroom. You know the feeling—stepping into a space where every line is sharp, every surface is clutter-free, and the bulky, traditional toilet tank is nowhere to be found. This modern aesthetic is largely made possible by the hidden heroes of plumbing: concealed cisterns. However, while the end result looks effortless, getting there requires a bit of technical finesse. If you are a homeowner or a DIY enthusiast looking to elevate your bathroom, understanding the nuances of Step-by-step installation tips for Riva concealed flush tanks is the first step toward a successful renovation. Let’s be honest, the idea of burying a water tank behind a wall can feel a bit daunting at first. What if it leaks? What if it doesn’t fit? These are natural concerns, but with the right guidance, the process is incredibly rewarding and surprisingly straightforward.
When we talk about modern plumbing, we aren’t just talking about moving water from point A to point B. We are talking about engineering that saves space and enhances the longevity of your fixtures. The shift toward wall-hung toilets and hidden cisterns has transformed bathroom design from a purely functional necessity into an architectural statement. In this comprehensive guide, we will break down the essential Step-by-step installation tips for Riva concealed flush tanks to ensure your project goes off without a hitch. Whether you are working with a solid wall or a stud partition, the principles of precision, leveling, and testing remain the same. Before you even pick up a wrench, it is vital to visualize the final layout, considering the height of the pan and the positioning of the flush plate. After all, a bathroom is a place of comfort, and every millimeter matters when it comes to ergonomics.
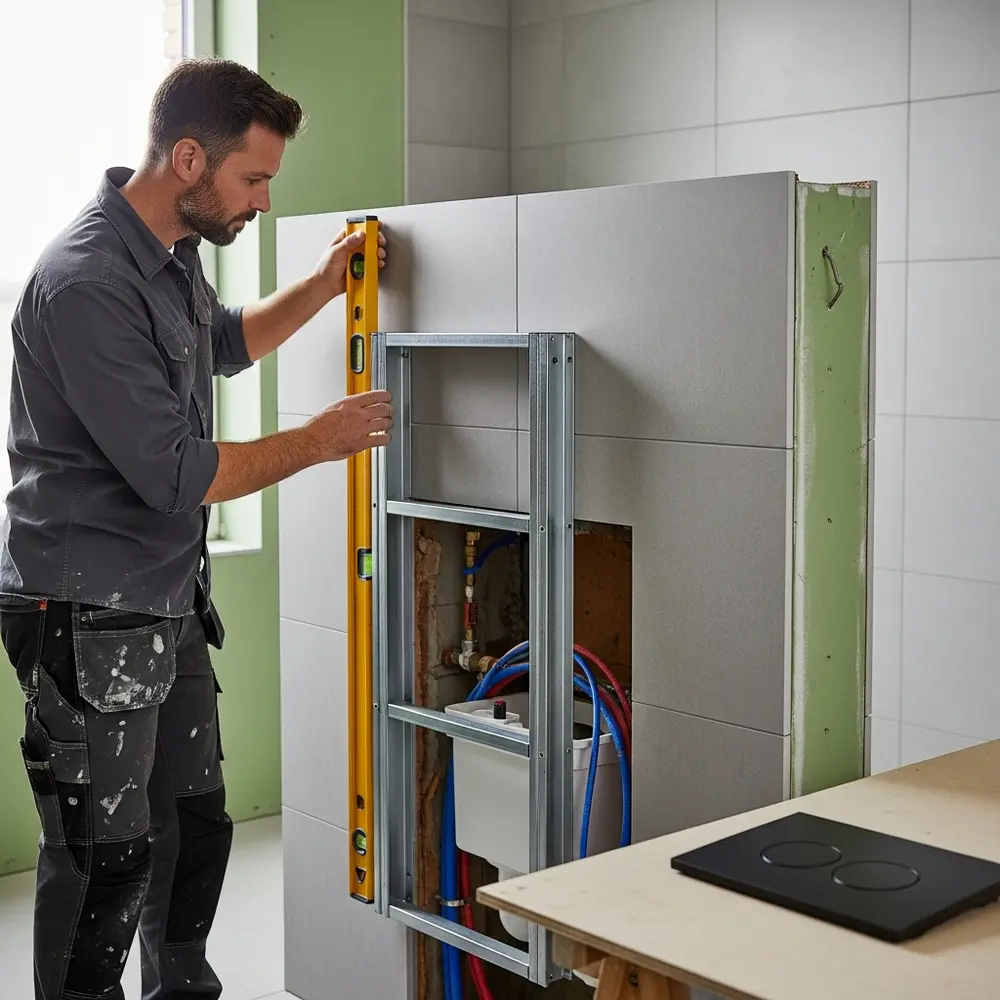
Understanding the Framework and Pre-Installation Planning
The journey to a sleek bathroom begins long before the first tile is laid. One of the most critical Step-by-step installation tips for Riva concealed flush tanks is to thoroughly inspect your site and your tools. You wouldn’t start a road trip without a map, and you shouldn’t start a plumbing project without a clear blueprint. First, identify the type of wall you are working with. Is it a load-bearing masonry wall, or are you building a false wall using timber or metal studs? This distinction determines which mounting frame you will need. Most modern systems use a self-supporting steel frame designed to take the weight of both the tank and the user, which can be as much as 400kg. It is always a good idea to browse through various Riva concealed flush tank models to find the one that fits your specific wall depth and height requirements.
Preparation also involves gathering the right gear. You will need a spirit level (this is your best friend in this project), a tape measure, adjustable wrenches, a drill with appropriate bits, and perhaps a pipe cutter. On the other hand, don’t forget the importance of the manufacturer’s manual. While general guides are helpful, specific torque settings and connector types can vary. During this phase, ensure the floor is level and the wall surface is clear of debris. If you are replacing an old floor-mounted toilet, you may need to relocate the waste pipe, which is often the most labor-intensive part of the job. However, once the “skeleton” of the plumbing is ready, the rest of the installation becomes a much smoother process of assembly and connection.
Step-by-step installation tips for Riva concealed flush tanks: Setting the Frame
The steel frame is the backbone of your entire setup. If the frame is crooked, the toilet will be crooked, and the flush plate will look off-center. To start, position the frame against the wall and mark the fixing points on the floor and the wall. A common mistake is to overlook the “finished floor level.” Remember, you will likely be adding tiles or laminate later, which adds height. Most frames have a 1-meter mark that should be exactly 1000mm from the finished floor level to ensure the toilet sits at the standard ergonomic height. This is one of those Step-by-step installation tips for Riva concealed flush tanks that professionals swear by—always measure from the intended final surface, not the raw concrete slab.
Once you have marked your holes, move the frame aside and drill. Secure the floor brackets first, then move to the wall fixings. Most high-quality frames come with adjustable wall brackets that allow you to fine-tune the depth. This is particularly useful if your wall isn’t perfectly plumb. Tighten everything up, but keep the spirit level handy to check the vertical and horizontal alignment constantly. If you are dealing with a particularly tight space, you might want to look into a Riva slim cistern installation, as these models are specifically engineered to fit into narrower wall cavities without sacrificing structural integrity or flush power. A stable frame is a silent frame; if it moves even slightly now, it will likely creak later, which is something every homeowner wants to avoid.
Plumbing Connections and the Dual-Flush Mechanism
Now we get to the heart of the matter: the water. Connecting the water supply to a concealed tank requires attention to detail to prevent future leaks that would be difficult to access. Most modern tanks offer multiple entry points for the water supply—usually from the top or the side. When connecting the internal valve, use a flexible hose or a copper pipe as per the instructions, but avoid using excessive plumber’s tape which can sometimes interfere with the fine threads of plastic valves. In fact, many professional installers prefer hand-tightening followed by a quarter-turn with a wrench to ensure a seal without cracking the housing. This is a vital part of the Step-by-step installation tips for Riva concealed flush tanks because a leak inside the wall is a nightmare scenario.
While connecting the water, it is also time to consider the efficiency of your flush. Modern systems almost exclusively feature a Riva dual-flush system, which allows users to choose between a full flush for solids and a reduced flush for liquids. This is not just an environmental choice; it is also a cost-saving one. Ensure that the pneumatic tubes or mechanical linkages that connect the flush button to the internal valve are clear of obstructions and not kinked. If the tubes are too long, they can get caught; if they are too short, the button won’t engage properly. Test the mechanism several times before closing the wall. Fill the tank, check for the “shut-off” point of the float valve, and trigger a few test flushes to ensure the water flows freely into the waste pipe and that the seals are watertight.
Constructing the Partition and Tiling
With the frame secured and the plumbing tested, it is time to hide the “guts” of the system. This is where the bathroom starts to transform. You will typically use moisture-resistant plasterboard (often blue or green) to create the wall face. Cut out the holes for the flush plate, the waste pipe, and the water inlet pipe using the template provided with the tank. It is essential to leave the protective covers on the pipe openings and the flush plate housing during this stage to prevent dust, grout, or mortar from entering the system. The Step-by-step installation tips for Riva concealed flush tanks emphasize that cleanliness during construction leads to a much longer lifespan for the internal valves.
Once the plasterboard is in place, you can proceed with tiling. When tiling around the flush plate area, try to plan your layout so that you don’t end up with tiny, awkward slivers of tile at the edges of the plate. A centered, symmetrical look always feels more premium. Speaking of premium, the build quality of a Riva system ensures that once the wall is closed, you won’t have to worry about the frame flexing or the tank sweating, thanks to high-quality insulation jackets that prevent condensation. After the tiles are set and grouted, you can finally remove the protective templates and trim the plastic housing of the flush plate flush with the tile surface. This precision ensures that the finish is sleek and professional.
Final Flourishes: Installing the Flush Plate and Pan
The flush plate is the only part of the system you will actually see and touch every day, making it a key design element. It is the crowning glory of your project. When choosing your hardware, you might be surprised at the variety available; for instance, you can find Riva flush plates in different colors including matte black, brushed gold, and classic chrome to match your faucets and towel rails. Installing the plate is usually a tool-free process, involving clicking the mounting frame into place and connecting the pneumatic hoses. Ensure the hoses are tucked away neatly so they don’t interfere with the button action. A soft, tactile “click” when you press the button is the sign of a job well done.
Finally, it is time to mount the toilet pan. This is often a two-person job, as you need to align the heavy ceramic bowl with the mounting bolts protruding from the frame while simultaneously ensuring the waste and inlet pipes are correctly inserted. Use a bit of lubricant (like soapy water or silicone spray) on the rubber seals to help the pipes slide into place without bunching up. Once the pan is pushed back against the tiles, tighten the nuts evenly on both sides. Don’t over-tighten, as ceramic can crack under extreme pressure. Apply a neat bead of silicone around the edge of the pan where it meets the tiles to provide a hygienic seal and a finished look. This concludes the primary Step-by-step installation tips for Riva concealed flush tanks, leaving you with a beautiful, functional centerpiece for your bathroom.
Maintenance and Longevity of Concealed Systems
One of the biggest myths about concealed tanks is that they are impossible to repair. Let’s set the record straight: they are designed with maintenance in mind. Access to the internal components—the fill valve and the flush valve—is gained entirely through the opening behind the flush plate. You don’t need to tear down the wall to fix a running toilet. Simply pop off the plate, and you can reach inside to remove and clean the valves. This ease of access is a core feature of high-end engineering. Over time, minerals from hard water can build up on the seals; a simple soak in vinegar or a quick replacement of the washer usually restores the system to perfect working order.
If you are still in the planning stages and haven’t purchased your hardware yet, it is highly recommended to buy Riva concealed tanks online from reputable suppliers. This ensures you are getting genuine components that are backed by a warranty and have a ready supply of spare parts if needed years down the line. Investing in quality upfront saves you the headache of searching for obscure parts later. The peace of mind that comes with a well-installed, high-quality system is worth every penny of the initial investment.
Why Choose a Concealed System for Your Next Project?
As we wrap up these Step-by-step installation tips for Riva concealed flush tanks, it’s worth reflecting on why this trend has become the standard in luxury home design. Beyond the obvious space-saving benefits, concealed tanks are significantly quieter than their exposed counterparts because the wall acts as a natural sound barrier. Additionally, cleaning becomes a breeze. Without a porcelain tank in the way and with the toilet lifted off the floor, you can mop the entire bathroom floor in seconds. It’s a win for aesthetics, a win for hygiene, and a win for property value.
Installing a concealed flush tank is a project that rewards patience and precision. While it requires more effort than a standard “close-coupled” toilet installation, the result is a bathroom that feels larger, brighter, and more sophisticated. By following these Step-by-step installation tips for Riva concealed flush tanks, you are not just installing a plumbing fixture; you are crafting an environment. Take your time with the leveling, double-check your connections, and choose finishes that reflect your personal style. In the end, you’ll have a bathroom that isn’t just a utility room, but a sanctuary of modern design. Happy renovating!